
So I wanted a cool LED controllable light up thingy… Because
- It lights up.
- I needed a status for my camera for the Teams stuff when I’m at home, so my Wife does not accidentally walk though the camera
- It’s a big bright light.
So I first looked at the unicorn hat, but this is discontinued, so then I went to my favorite electronics store, Adafruit.com, and they did not have what I wanted in stock, so I found a cheap knockoff on amazon (azin #B081BCBQ6B if you are interested) and wired it up.
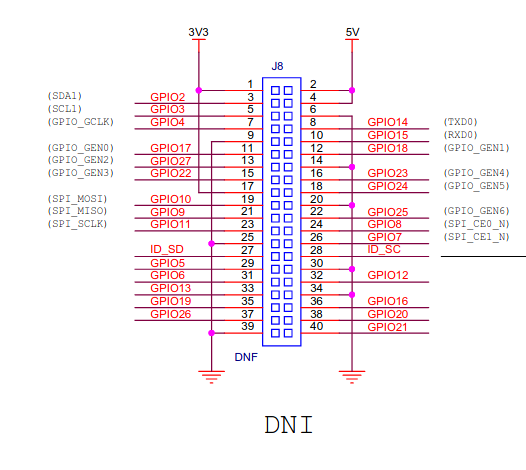
I’m working off of port 18, and pulling power from the usb port for the PI, and it seems to work well, and it’s a simple 3 wire hookup, +5v, Gnd, and Data (GPIO18).
First thing is to wire up the circuit. This is the pinout for the header on a Rasbery Pi Zero W, Directly from https://www.raspberrypi.org/documentation/hardware/raspberrypi/schematics/rpi_SCH_ZeroW_1p1_reduced.pdf The even pins are on the outside of the board.
Now for software, I’m going to use Python, because, well, it’s easy. Make sure you are running Python v3, and then add the Adafruit libraries in.
    sudo pip3 install rpi_ws281x adafruit-circuitpython-neopixel
    sudo python3 -m pip install --force-reinstall adafruit-blinka
Now we need a tester, so let’s also use Adafruit’s tester as well. I’ve modified it for 64 pixels, but nothing else yet. The code is mirrored here if you want to try it.
# Simple test for NeoPixels on Raspberry Pi
import time
import board
import neopixel


# Choose an open pin connected to the Data In of the NeoPixel strip, i.e. board.D18
# NeoPixels must be connected to D10, D12, D18 or D21 to work.
pixel_pin = board.D18

# The number of NeoPixels
num_pixels = 64

# The order of the pixel colors - RGB or GRB. Some NeoPixels have red and green reversed!
# For RGBW NeoPixels, simply change the ORDER to RGBW or GRBW.
ORDER = neopixel.GRB

pixels = neopixel.NeoPixel(
    pixel_pin, num_pixels, brightness=0.2, auto_write=False, pixel_order=ORDER
)


def wheel(pos):
    # Input a value 0 to 255 to get a color value.
    # The colours are a transition r - g - b - back to r.
    if pos < 0 or pos > 255:
        r = g = b = 0
    elif pos < 85:
        r = int(pos * 3)
        g = int(255 - pos * 3)
        b = 0
    elif pos < 170:
        pos -= 85
        r = int(255 - pos * 3)
        g = 0
        b = int(pos * 3)
    else:
        pos -= 170
        r = 0
        g = int(pos * 3)
        b = int(255 - pos * 3)
    return (r, g, b) if ORDER in (neopixel.RGB, neopixel.GRB) else (r, g, b, 0)


def rainbow_cycle(wait):
    for j in range(255):
        for i in range(num_pixels):
            pixel_index = (i * 256 // num_pixels) + j
            pixels[i] = wheel(pixel_index & 255)
        pixels.show()
        time.sleep(wait)


while True:
    # Comment this line out if you have RGBW/GRBW NeoPixels
    pixels.fill((255, 0, 0))
    # Uncomment this line if you have RGBW/GRBW NeoPixels
    # pixels.fill((255, 0, 0, 0))
    pixels.show()
    time.sleep(1)

    # Comment this line out if you have RGBW/GRBW NeoPixels
    pixels.fill((0, 255, 0))
    # Uncomment this line if you have RGBW/GRBW NeoPixels
    # pixels.fill((0, 255, 0, 0))
    pixels.show()
    time.sleep(1)

    # Comment this line out if you have RGBW/GRBW NeoPixels
    pixels.fill((0, 0, 255))
    # Uncomment this line if you have RGBW/GRBW NeoPixels
    # pixels.fill((0, 0, 255, 0))
    pixels.show()
    time.sleep(1)

    rainbow_cycle(0.001)  # rainbow cycle with 1ms delay per step
The result is awesome.